Employee-Owned | Community-Minded | Let's Build it Together
We are happy to assist 24 hours a day, 7 days a week so if you have any questions about AP&T Telephone services or require technical support, please contact us toll-free at 1.866.793.4179 or submit a trouble ticket from the Submit Telephone Trouble page.
Call Waiting alerts you that another call is waiting as it permits you to hold your first call and answer the second. A beep tone indicates another call is waiting, one reminder tone will be heard 10 seconds later if the second call still remains unanswered and the second caller hears the normal ringing tone only.
To Answer the Second Call:
This feature provides you with the ability to disable the call waiting feature for the duration of one call. You will not be disturbed while on this call. Also, it’s useful when transmitting data using a computer and you do not wish to have the call interrupted.
To Activate Cancel Call Waiting Prior to Placing a Call:
You can call up to 8 of your most frequently dialed numbers by calling a one-digit code. This includes long distance DDD numbers. When saving a long distance number, enter 1 + Area Code + Phone Number. The maximum number of digits you can program for each number is 28.
To Establish Your Speed Calling List:
You can call up to 30 of your most frequently dialed numbers by dialing a two-digit code. This includes long distance DDD numbers. When saving a long distance number, enter 1+ Area Code + Phone Number. The maximum number of digits that you can program for each number is 28.
To Establish Your Speed Calling List:
Three Way Calling allows you to call another party and add them to your conversation.
Add a Third Party:
To Disconnect the Third Party:
To Disconnect Completely:
When you subscribe to Caller ID, this service will route any incoming calls for a telephone number that is blocked to a recording. Your phone will not ring; instead, callers will hear a message indicating that you are not accepting calls that are blocked.
To Use Anonymous Call Rejection:
To Cancel Anonymous Call Rejection:
Per Call Blocking prevents your name and number from being delivered on a single call. Instead, the word “PRIVATE” or “ANONYMOUS” will display if you are calling someone who has Caller ID. At the time Caller ID is made available in your area, Per Call Blocking will be added to your line and there is no charge to use it.
To Activate Per Call Blocking:
Per Line Blocking prevents your name and telephone number from being delivered on all calls. The word “PRIVATE” or “ANONYMOUS” will display if you are calling someone who has Caller ID. There is no charge for this service. However, if you order line blocking, then change your mind and have it removed, then reorder the service, a fee would apply for the second installation. The option of displaying your number on specific individual calls is available at no additional charge.
To Display Your Number On an Individual Call:
If you receive harassing or obscene phone calls and feel that you need assistance, Call Trace may help. Upon request, traced information will be turned over to local law enforcement authorities. Under no circumstances will you be given the name or the telephone number of the person who called you. There is a $5 charge for each *57 activation. If the situation becomes life threatening, contact the police immediately.
To Trace a Local Call:
Last Call Return will identify/return the number of the last incoming call whether answered or not.
To Use Last Call Return:
Selective Call Forwarding allows you to create a list of telephone numbers, and program them to be forwarded to a telephone number of your choice.
To Activate Selective Call Forwarding:
Calling Number ID lets you see the number of the person calling you. The date and time of day each call was received can also be displayed. You need to have a Caller ID display device to use this service. For information on purchasing a display device, call your local business office.
This service usually displays phone numbers that are inside your local calling area, unless the caller has blocked his number.
If the number is not available, the screen will show “Out Of Area” or “Private Number” instead of the phone number.
If you have Call Waiting and Calling Number ID, the phone numbers of waiting calls are not displayed because the unit must first hear one ring before it can display a number.
Whether at home or as a business owner, you wouldn’t think of not returning an important call, much less one that may generate revenue. So why trust your important messages to a cell phone that may be out of range or battery power? Or worse, a piece of equipment that may malfunction, doesn’t take messages while you’re on the other line and stops working altogether if the lights go out?
For just $2.00 a month, AP&T’s new enhanced Voice Messaging eliminates the need for an answering machine, taking all of your calls while you’re busy on other lines, and even continuing to work if the power is out! PLUS our e-mail notification feature allows you to have your Voicemail delivered to your e-mail as well….simply click and listen!
GETTING STARTED
To enter and setup your voicemail box from HOME, dial *94. When the greeting begins, press 0 for Mailbox Options. Next a voice prompt will guide you through the necessary steps to setup and personalize your mailbox allowing you to record your name, greeting, outgoing messages and passcode.
Your security passcode must be a four (4) digit number, easy to remember, yet hard for someone else to guess. While setting up your voicemail, you may return to the main menu at any time by pressing the * key on your phone.
AWAY FROM HOME
To access your voicemail while out of town or from a wireless phone, dial the local access number shown that represents your home calling area.
Next, enter your seven (7) digit home phone number (do not include the area code). Then, enter your security passcode number to access your messages.
Once you have accessed your voicemail, the automated system will tell you if you have new messages and will give you prompts for additional options such as retrieving old messages, re-recording your outgoing message(s) or changing your passcode.
MAIN MENU PROMPTS
Within each of the above Main Menu selections are several sub-prompts to assist in the management of messaging activity. The next panel provides a brief overview of the functions within each Main Menu Item.
It is important to remember the maximum capacity of your mailbox is thirty (30) messages. This includes both new messages and old messages that have been saved. The maximum length of each message cannot exceed two (2) minutes. Callers will be unable to leave messages in a voicemail box that has reached the thirty (30) message capacity.
MAIN MENU FUNCTIONS
REMINDER: In all menu modes, the user may press the * key to return to the main menu at any time. Similarly, the # key may be pressed to exit the voicemail system.
EMAIL NOTIFICATION
AP&T Voicemail can send your voicemail directly to your email inbox each time a new message is received. Simply Click and Listen.
Please speak with your local office to setup the AP&T Voicemail Email Notification for your service.
Prior to making contact with AP&T for assistance with your telephone service, these steps can help you determine why your phone isn’t working:
Check to see if all your telephones are hung up.
Perform a visual inspection of all exposed wiring and connections for damage or loose connections.
When there is more than one outlet, check each instrument at each outlet to determine if proper operation can be obtained from any outlet. If proper operation is obtained from any outlet, the trouble has been isolated to an instrument or house wiring.
In order to isolate jack or house wiring problems, simply move a working telephone to each outlet in the house to determine which location is causing the trouble.
Network Interface (NID) may have been installed where your telephone service wire comes into your premise. This test point is there to assist in isolating your wiring trouble from the telephone company’s trouble.
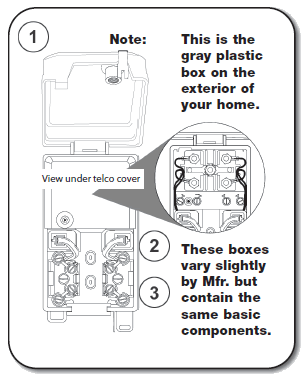
1. Inside cover information for step-by-step troubleshooting.
CAUTION: Remove plug from test jack before making wire changes.
TO TEST LINE: Remove plug from test jack-plug in working phone. If you can make a call, problem is inside house. If you cannot make a call, unplug phone, replace plug in test jack and contact your local office.
2. Plug RJ 11 Jack. Squeeze top of plug and gently pull straight out.
3. Inside wire, binding posts (all posts have color coded wires terminated to them.
You pay one flat rate for both in-state and out-of-state long distance direct dial calls – Only $.10 per minute – any time, any day, and no monthly fee applies. The pricing on this plan applies to direct dial calls only and does not include operator assist, collect, or calling card calls.
As an AP&T Internet customer, you will have access to the Internet Bonus Plan, which offers a long-distance calling rate of $.07 per minute for direct dial out-of-state calls and $.07 per minute for direct dial in-state calls. All rates on this plan apply to direct dial calls only and do not include operator assist, collect or calling card calls.
Allows business customers to have a flat rate plan. Out-of-state per minute rates are $.12 any day, any time, and in state are also $.12 per minute.
As an AP&T Internet Customer, you will have access to the Internet Bonus Plan, which offers a long-distance calling rate of $.07 a minute for direct dial out of state calls. All rates on this plan apply to direct dial calls only and do not include operator assist, collect, or calling card calls.
For more information contact your local office.
Customers can also subscribe to toll-free services (800, 888, 866, 877) through AP&T Long Distance.
AP&T telephone service has been typically provided over copper local loop facilities and as we work toward providing service over fiber optic facilities there are some safety elements that we felt were necessary to disclose. Copper fed telephone service does not require electricity to use the service. Fiber fed telephone service is dependent upon electricity due to the use of an Optical Network Terminal (ONT) which derives its power from the customer premises electrical supply.
During the transition from copper to fiber telephone facilities, AP&T is installing a backup power unit free of charge that will allow telephone service to function during a power outage for an estimated 4 hours of standby time and 1 hour of talk time.
Customer Responsibilities
As a customer, you are responsible for maintaining a backup power unit to use your telephone service and retain the ability to connect to 911 emergency services during a power outage.
Confirm that any backup power source is correctly installed.
Periodically check the indicators on your backup power source to make sure that it is properly charged and functioning.
The backup power unit should only be used to power the Optical Network Terminal (ONT) to support telephone use.
Properly store your backup power source, do not subject it to rough handling or excessive temperatures or otherwise subject it to abuse.
If you purchase a backup power source on your own, verify that it is compatible with AP&T’s telephone service.
Use backup power sources judiciously during a power outage, remaining aware of factors that may shorten the lifespan of the backup source.
Be mindful that the backup power duration depends on the age and size of your battery backup unit.
Consider a 24-hour standby battery backup option for sale at our local AP&T office.
Leaving Town?
If you are leaving town and planning to disconnect your power service, the Optical Network Terminal (ONT) should be disconnected from the battery backup unit as it could be damaged if left drained and unpowered for a long duration.
If you need any assistance with disconnecting your backup power source (battery) from the ONT, please refer to the instructions below.
Backup Power Disconnect Procedure
© 2026 Alaska Power & Telephone Company. All Rights Reserved